Friday, September 21, 2012

DIY Tummy Time Mirror


 Baby hated tummy time, until I made this mirror!!!!!
I searched everywhere for a big enough baby safe mirror to do tummy time. I ended up making my own.


I don't have a tutorial, but if you can sew, this is just a "frame", like a picture frame, but made out of fabric, in which I inserted the mirror. I made the mirror with a thin sheath of acrylic that my husband bought for me at a hardware store, and mylar. 
Mylar is a reflective film used for a lot of stuff, I don't really know for what, but I found it a hydroponics' store. I cut it to fit the acrylic sheet and then used spray adhesive to stick it in place. 
Baby loves!!!!!!!!!!!!


Rorschach Test T-shirt (Inkblot)

I made this T shirt a while ago, I think it is an easy technique that will look great in a mini skirt as well. 
You need a plain T shirt, fabric paint, a thin cardboard, and pins. I used a gift box for the card board. 

 Mark the center front top and bottom of the T shirt with pins. Fold the cardboard in half. You want the cardboard to cover the area that you want painted.
 Place the cardboard inside the T shirt and pin them together, matching the fold to the center front. Pin them together tight.
I used Tulip fabric paint, the neon pink has subtle glitter, FAB!!!!
Make the desired design with paint. Take into account anatomical landmarks, so you don't end up with strange looking boobs!!!!!


Fold the cardboard with the T shirt in one swift motion, press with your hands, and open quickly as well, without dragging the fabric.


Now repeat for every T shirt in your closet, in every color possible!!!!!!


Saturday, June 16, 2012

Baby Burp Cloths DIY


Being a new mom is super exciting, and like every mother says, this is the best thing I have ever done!
Needless to say, the time left to do anything is non existent, thanks to my mom I can eat and take a shower.

This DIY is best to do before the baby is born, when all yo want to do is lay down with your feet up.
Take regular burp cloths, they sell them in a bag of multiples. Crochet the edges and you can either embroider a design on one end, or sew a patch with a character. I can't crochet, so my mother made the edges for me ( thank you mom) and I embroidered the designs on my embroidery machine.
You can never have enough of this!


Friday, March 30, 2012

DIY Neon shoes

DIY NEON SHOES


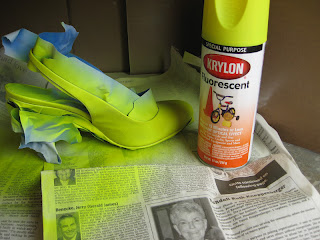
All I see online is neon, neon, neon, but it is almost impossible to find a cute pair of neon yellow shoes at an affordable price.  I took a pair of shoes that I have never worn but have kept for over a year and painted them neon yellow. It was relatively easy, I used regular spray paint and after wearing them they cracked a little, but it is not very noticeable. Leather paint would be best, but I can't find that anywhere.


You need:
a pair of shoes that you don't mind ruining
tape
white spray primer or paint ( it makes the neon look brighter)
neon spray paint of your choice
rubbing alcohol
clear paint to seal the color.


First, use alcohol to rub off the shinny finish on your shoes.


Use tape to mask everything you don't want painted.

 Prepare a well ventilated area, outdoors is better.
I use a cardboard box sideways and newspaper, so the paint doesn't fly everywhere.
Spray the shoes with thin coats, so the paint doesn't drip. I used about 4 coats of primer, very light.
Let it dry and when dry , spray thin light coats of the neon color until evenly coated. Remove the tape before the paint is dry, to avoid peeling of the paint.  Finish with a clear coat and let dry for 24 hours


Let dry for 24 hours,


Wear proudly!!!!!!!!!!!!


DIY NEON SHOES

Saturday, March 24, 2012

Spring Rolls!!!!!!!!!!!!!!!!!

with peanut dipping sauce.......


It's already getting hot in Arizona, and I wanted to treat my hubby to something fresh and flavorful.   He loves spring rolls. This is my version, with a spicy peanut sauce.  Be patient rolling this, once you get the hang of it it is really easy. Enjoy!!!!!!!


Ingredients:
Spring roll papers
rice noodles
veggies, I use carrots, bell peppers, basil, and green onion
crushed peanuts
shrimp
imitation crab meat sticks, if you want variety, it looks pretty too!

For the sauce:
peanut butter about 2 tablespoons
hot sauce to taste
hoisin sauce about 4 tablespoons
garlic, 1 clove crushed
ginger about 1 teaspoon, fresh is best
water about 4 tablespoons,
Mix everything well until blended. 


Cook the rice noodles as per package  directions. Save the hot water to soak the rice papers.

Soak the rice papers one by one, you will soak the paper, make the roll, soak the next one, etc. Do not let go of the paper or you will loose it!
Place the soaked paper on a plate, arrange the ingredients and roll as in the pictures. I show shrimp , but also you can use imitation or real crab.  Do not overstuff, serve with the dipping sauce. Make many, they keep in the fridge well. 


Friday, January 27, 2012

MAKE MATERNITY PANTS BASED ON  YOUR FAVORITE PANTS


Maternity clothes are not great. there are thousands of regular clothe styles out there, but just a few of maternity clothes, they don't fit well, at least not me. I decided to male a pair of pants for work from one of my favorite pair of pants, they have a slim leg, and are close fitting in the rear without being like a legging. It was super easy. I didn't add pockets, since tops are usually long. 

All you need is tracing paper, i use kitchen wax paper, pins, fabric of choice, your favorite pants, lycra fabric for tummy band. 

Take your favorite pants and spread one leg out on a flat surface. Pin your tracing paper on the front of the lag, close to the seam. Make sure to include the crotch area. You don't need to include the whole length up to the waist, since this will not be needed, only trace from where the elastic band will start down. This is shorter on the front that the back.


Trace with a marker around the seams. 


 Do the same for the back of the leg. The crotch on the back is wider, or deeper, so you may need to add paper here to have an accurate pattern. Mark on both paper parts a common area, the hip, or inner leg, so when you are constructing, you can match this.

Since the back of the leg is wider than the front,, it will not lay flat, so you have to wrap the paper around the leg.
 Trace and cut your pieces,
 Cut your pants from the fashion fabric. The front top is shorter than the back, for the belly.
Measure around your tummy to determine the width of the panel. This is lycra, or swimwear fabric.  The front center part is deeper than the back.

Sew the center back seam.


Put one leg inside the other with right sides together and sew the center seam.
                                                                Almost done!!!!!!!!!!!!!!!!


                                               Sew the band to the top of the pants. Turn the top raw edge under and hem with a zig zag stitch, hem your pants, and they are done!!! Easy!!!!!!!!!!


PINK ELEPHANTS

I was certain that my baby was a girl, looked like a girl in every ultrasound up to two weeks ago, when he finally decided to show us good!!! I wanted a pink jungle nursery, so I made this elephants for the wall, I guess now I have to make them again in blue!!!!!
I hope you like this easy project. 

You need fabric and a wood stretcher. I used an old picture and ripped the canvas out. 

The setting on the sewing machine is for a satin stitch. it is a zig zag that is very close together.  For the elephant silhouettes, I searched google images and drew inspiration from some pictures, and then created my own by tracing into white paper. 

This is more or less what I wanted to make, so I traced the elephants on the paper. Each on a different sheath of paper.   I changed it afterwards to make a curved trunk for the big elephant, so it looks like mammy elephant is hugging her baby.
 I cut each silhouette and then I cut them out of the fabric I selected.


I used a satin stitch to make the ear shape and the little eyes.  Afterwards, I positioned them until I was satisfied. i ended up cutting mommy's trunk shorter. 
I sewed all around the borders with the satin stitch, using contrasting thread for each. 
When the sewing was done, I stretched over the wood frame and stapled it. 


Pink elephants!!!!!!!!!!!!!!